

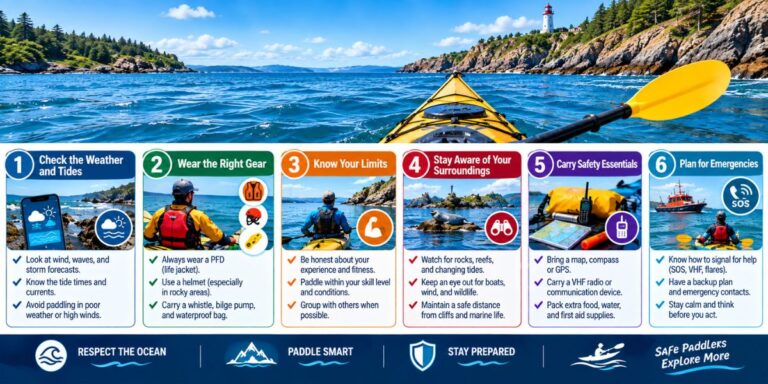
Coastal water plays by a different set of rules than a lake or a slow-moving river. The shoreline itself shifts as the tide moves, wind blowing offshore can feel harmless right up until you try to paddle back against it, and rip currents can form near beach openings and inlets with almost no warning. If you’re gearing up for your first saltwater trip, understanding these differences isn’t optional — it’s the foundation everything else builds on.
You don’t need years of paddling experience to get out on coastal water safely. You do need to be comfortable with basic paddling skills before adding tides, wind, and swell into the mix, and you need to prepare differently than you would for any inland trip.
What Actually Makes Coastal Paddling Different
Coastal paddling means kayaking in open saltwater environments — oceans, bays, estuaries, and exposed shorelines — rather than the calm, predictable water of lakes and rivers. The conditions shift constantly, driven by tide, wind, waves, and weather working together, sometimes in ways that change dramatically over the course of just a few hours.
Most paddlers who get into real trouble offshore weren’t being careless. They just didn’t account for how quickly a calm morning can turn into a genuinely difficult afternoon once wind builds and the tide turns. Three forces are working against you simultaneously in a way flatwater paddling never involves:
- Tides create currents that can run 2 to 5 knots in tidal channels — faster than most recreational paddlers can move against.
- Swell arrives from storms that may be hundreds of miles away, showing up as breaking waves even on an otherwise calm, sunny day.
- Offshore wind feels manageable when you’re launching with it at your back, but turns into a serious problem the moment you need to paddle back into it.
Experience on rivers and lakes helps build general paddling competence, but it doesn’t fully transfer. The coast needs to be approached on its own terms.
Choosing a Kayak That Can Actually Handle the Coast
A short, wide recreational kayak — the kind common on lakes and slow rivers — isn’t built for open coastal water. It sits lower, tracks poorly in wind, and doesn’t handle swell well, and that combination becomes a real liability once you’re outside a protected bay.
| Kayak Type | Best For | Coastal Suitability |
|---|---|---|
| Recreational kayak (under 12 ft) | Calm lakes, slow rivers | Not recommended for open coast |
| Touring/sea kayak (14–18 ft) | Open water, exposed coast, distance | Recommended for coastal paddling |
| Sit-on-top sea kayak | Warm coastal water, surf launches | Fine with proper training |
| Inflatable touring kayak | Travel, protected bays | Only in sheltered conditions |
A proper touring or sea kayak is longer and narrower, with a defined bow and stern designed to cut through chop rather than bounce over it. If you’re renting, be specific with the outfitter — tell them you’re paddling exposed coastal water and ask for a touring or sea kayak by name, not just “a kayak.” And if you’re buying or renting for a longer trip, sit in it in calm water for a solid 20 minutes first — comfort issues that seem minor on a short test paddle become real problems several hours into an actual coastal trip.
The Safety Gear You Actually Need
A Coast Guard-approved PFD (Type III or V) needs to be worn at all times, not just stored in the boat. Cold water shock can incapacitate you within seconds of a capsize, and a PFD you’re not already wearing does you no good in that window.
Beyond that, your core gear list should include:
- A bilge pump, tow line, and spare paddle — a broken or lost paddle in coastal wind and current isn’t a minor inconvenience, it’s a real safety risk.
- A VHF marine radio, which connects directly to Coast Guard Channel 16 and works far more reliably offshore than a phone, which depends on signal strength, battery life, and being kept dry.
- A personal locator beacon (PLB) for satellite-based backup when you’re beyond radio or cell range — always register it with NOAA before you head out, since registration links the device to your emergency contacts and shortens response time.
- Visual distress signals — a whistle, flare, or signal mirror — that you can reach without digging through pockets, since your hands may already be busy managing the boat or holding onto someone else.
- A navigation light for dawn, dusk, or fog, so you stay visible to other boat traffic in conditions where visibility is already reduced.
The U.S. Coast Guard’s Boating Safety Resource Center keeps current, state-specific equipment requirements if you want to check exactly what’s mandated where you’re paddling.
Dress for the Water, Not the Weather
This is probably the most commonly ignored safety principle in coastal paddling, especially on a warm, sunny day when the air feels perfectly comfortable. Cold shock hits hardest in water between 50°F and 60°F, where most people briefly lose control of their breathing the instant they hit the water. That reaction passes within a minute or two, but swimming failure — the point where your arms and legs stop responding well enough to self-rescue — can follow within 10 to 15 minutes in that same temperature range. Hypothermia is actually the slowest of the three dangers to set in, which is exactly why survival charts built only around hypothermia risk tend to understate how dangerous cold water really is.
| Water Temperature | Recommended Protection | Unprotected Swim Survival Window |
|---|---|---|
| Below 50°F (10°C) | Dry suit with thermal layer | Under 1 hour |
| 50–60°F (10–15.5°C) | Dry suit or 5mm wetsuit | 1–6 hours |
| 60–70°F (15.5–21°C) | 3mm wetsuit minimum | Meaningful risk remains |
| Above 70°F (21°C) | Paddling layers, sun protection | Lower risk; heat becomes the concern |
Before every trip, check the sea surface temperature at the nearest NOAA buoy rather than trusting a general weather app — air temperature and water temperature can diverge more than people expect, especially in spring and fall.
Reading the Water and Sky Before You Launch
A few conditions deserve specific attention every single time you plan a trip:
- Wind direction matters more than wind speed. Offshore wind pushes you away from land, and the harder part is always the return trip, not the launch.
- Small craft advisories apply to kayaks too. If one’s in effect, postpone the trip — it’s a direct signal that conditions are unsafe for small vessels, kayaks included.
- Tidal races form where currents cross shallow areas, creating turbulent, unpredictable water. These zones need to be identified on a chart and avoided, especially if you’re still building coastal experience.
- Rip currents pull straight out to sea near beach openings and inlets. If you get caught in one, don’t fight it head-on — swim or paddle parallel to the beach until you’re out of the current, then head back to shore.
- Boat traffic is a real hazard, since kayaks sit low and are easy for larger vessels to miss. A simple trick: watch an oncoming boat against a fixed point on your own kayak. If that relative position doesn’t shift, you’re on a collision course and need to change direction early, before it closes the distance.
Write a Paddle Plan Every Single Time
A paddle plan takes about five minutes to put together and can dramatically shorten search-and-rescue response time if something goes wrong. It should include your launch point, intended route, planned landing spot, expected return time, a description of your kayak, and who’s responsible for calling the Coast Guard if you don’t check in.
Give the plan to whoever is most likely to actually notice quickly if you’re late — a housemate expecting you for dinner will realize something’s wrong far sooner than a relative in another state. Keep one copy in your vehicle and a waterproof copy inside your kayak’s hatch, in case you and the boat get separated during a capsize. In the U.S., the Coast Guard Auxiliary’s Float Plan Central offers a free way to file one directly online.
Practicing Self-Rescue Before You Need It
Coastal safety really comes down to whether you can recover quickly and calmly after a capsize, and that only comes from practice.
Wet exit: Tuck forward to protect your face before leaving the cockpit, release the spray skirt with a firm pull on the front grab loop, and push yourself out and away from the kayak, staying relaxed rather than fighting the water.
Paddle float re-entry: Inflate the float and secure it to one paddle blade, position the paddle behind the cockpit as an outrigger for stability, and use that stabilized setup to climb back in. This is a technique worth rehearsing repeatedly in calm water — it does not feel intuitive the first few times.
T-rescue (with a partner): One paddler positions their kayak perpendicular to the capsized paddler’s boat, creating a stable platform the person in the water can use to climb back in. It requires practice and real coordination, but it’s significantly faster than a solo re-entry when a second paddler is available.
One thing worth mentioning from real experience: the cold hits before the panic does the first time you practice a wet exit in open water. Expecting that helps — if you know the cold is coming first, it’s a lot easier to stay calm and think through the rest of the recovery instead of reacting purely on instinct.
Why You Shouldn’t Paddle Coastal Water Alone
Solo coastal paddling isn’t a good idea for beginners, or really for anyone on an unfamiliar stretch of coast. The math changes completely with a second person present — a T-rescue needs two boats, and handling an emergency call is far easier when one person can manage the radio while the other looks after a capsized paddler.
If you’re paddling as a group, designate a lead and a sweep before you launch. The lead sets the pace and route; the sweep stays behind everyone else and makes sure no one falls back unnoticed. Agree on whistle signals in advance — one blast for attention, three short blasts for an emergency — and keep the group within visual range of each other, not just whistle range, since wind and wave noise can swallow a whistle far more easily on the water than it seems like it would on land.
If you don’t know other coastal paddlers yet, the American Canoe Association maintains a club directory that can connect you with local groups and guided trips — a solid way to build experience alongside people who already know the local conditions.
Communication Devices Compared
| Device | Range | How to Use in an Emergency |
|---|---|---|
| VHF marine radio (handheld) | 5–10 miles (line of sight) | Channel 16: say “Mayday” three times, give name, location, and nature of distress |
| Personal Locator Beacon (PLB) | Global via satellite | Pull the activation pin; sends GPS location to NOAA COSPAS-SARSAT and the Coast Guard |
| Satellite messenger (Garmin inReach, SPOT) | Global via satellite | SOS function with two-way messaging; requires an active subscription |
A phone should be treated as a backup at best offshore — signal, battery, and water exposure all limit how reliable it actually is when it matters most.
The Mistakes That Keep Showing Up
A handful of preventable mistakes account for most beginner trouble on the coast: launching into offshore wind without checking the forecast first, dressing for air temperature instead of water temperature, misjudging how much harder the return trip will be against wind or current, skipping self-rescue practice entirely, and heading out solo into unfamiliar water. None of these require advanced skill to avoid — they just require treating preparation as seriously as the paddling itself.
A Few Additional Things Worth Knowing
Beyond the core points, a few extra habits tend to separate paddlers who handle coastal conditions well from those who get caught off guard:
Check the marine forecast, not just the general weather app. Marine forecasts include wave height, swell period, and small craft advisories that standard weather apps typically leave out entirely — and those details matter far more for kayaking than a simple rain-or-shine prediction does.
Learn to recognize fog rolling in early. Coastal fog can drop visibility to almost nothing surprisingly fast, especially in the afternoon in certain regions. If visibility starts dropping, head toward shore immediately rather than waiting to see if it clears — fog is one of the few coastal hazards where waiting it out is rarely the right call.
Pack more calories and water than you think you’ll need. Cold exposure and constant bracing against wind and chop burn through energy much faster than flatwater paddling does, and a paddler running low on fuel makes worse decisions exactly when good judgment matters most.
Reassess conditions at your turnaround point, not just before launch. Conditions that were fine at 9 a.m. can be meaningfully different by early afternoon. Treat your planned turnaround as a real decision point, not just a formality — if wind or swell has picked up more than expected, adjust the plan rather than sticking to the original route out of habit.
The Bottom Line
Coastal paddling rewards preparation in a way flatwater paddling simply doesn’t demand. The right kayak, gear dressed for water temperature rather than air temperature, a written paddle plan, practiced self-rescue skills, and a paddling partner all stack together to turn what could be a genuinely dangerous environment into one that’s manageable and, honestly, one of the more rewarding kinds of paddling there is once you’ve got the fundamentals down.
