

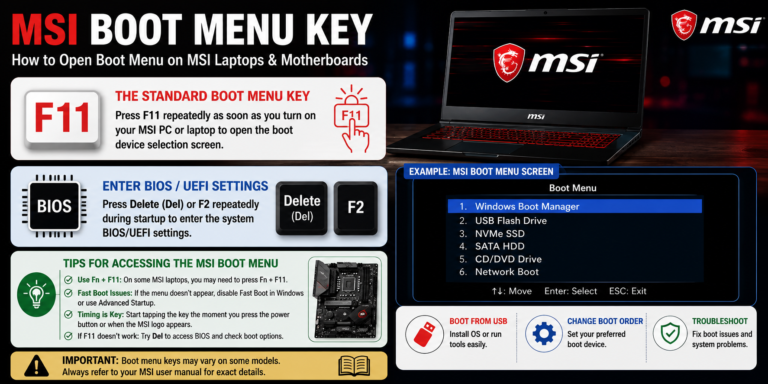
If you need to start your MSI computer from a USB drive, SSD, Windows installation media, or another bootable device, you usually don’t need to change the permanent boot order in BIOS. On supported MSI systems, the F11 key opens the Boot Menu, allowing you to choose a boot device for that startup.
MSI’s own documentation confirms that F11 is used to open the boot-device selection menu on supported motherboards and notebooks.
What Is the MSI Boot Menu Key?
The standard MSI boot menu key is:
F11
To use it, completely shut down your MSI PC or laptop. Turn it on and begin pressing F11 repeatedly during startup, particularly as the MSI logo appears.
When the Boot Menu opens, you should see available boot devices such as:
- USB flash drive
- NVMe SSD
- SATA hard drive
- Windows Boot Manager
- DVD or optical drive
- Network boot options
Select the device you want and press Enter.
MSI’s support documentation specifically instructs users to repeatedly press F11 during startup to enter the boot-device selection screen.
F11 vs. Delete: What’s the Difference?
One of the most common mistakes is confusing the Boot Menu with the BIOS/UEFI setup.
F11 — Boot Menu
Press F11 when you want to select a device for the current boot.
For example, you might use it when you want to:
- Boot Windows from a USB installer
- Start a Linux installer
- Boot from a recovery drive
- Test another bootable device
- Select a different operating system
Delete — BIOS/UEFI Setup
Press Delete (Del) when you want to enter the BIOS/UEFI settings.
From there, you can change settings such as boot order, hardware configuration, and other firmware options. MSI’s boot troubleshooting documentation instructs users to press Del continuously to enter BIOS and then access the Boot settings.
In simple terms:
F11 = Choose what to boot now
Del = Change BIOS/UEFI settings
How to Open the MSI Boot Menu
Follow these steps if you want to boot from a USB drive or another device.
Step 1: Connect Your Bootable Device
Insert your bootable USB flash drive into the MSI computer.
Make sure the USB drive has been prepared correctly. If you’re installing Windows, for example, use properly created installation media rather than simply copying Windows files onto a USB drive.
Step 2: Shut Down the Computer
A complete shutdown can make it easier to catch the early startup screen.
If Windows is currently running, shut down the PC normally.
Step 3: Turn the Computer On
Press the power button.
As soon as the computer begins starting, prepare to press F11.
Step 4: Press F11 Repeatedly
Press F11 repeatedly while the MSI logo is appearing.
Don’t wait until Windows begins loading.
MSI’s current support guidance for notebooks specifically recommends shutting down and pressing F11 repeatedly as the MSI logo is about to appear if the Boot Menu does not initially open.
Step 5: Select Your Boot Device
Once the Boot Menu appears, use the arrow keys to highlight the device you want.
For example:
UEFI: USB Flash Drive
Then press Enter.
The computer should attempt to start from that device.
How to Boot From a USB Drive on an MSI Laptop
MSI provides specific instructions for installing Windows on its notebooks using a USB installation drive.
Connect the Windows installation USB, power on the laptop, and repeatedly press F11 during startup. Once the Boot Menu appears, select the Windows installation media.
The basic process is:
USB connected → Power on → Press F11 → Select USB → Enter
If the USB drive doesn’t appear, the problem may be with the USB media, its boot configuration, or the laptop’s firmware settings rather than the F11 key itself.
What If F11 Doesn’t Open the Boot Menu?
Sometimes pressing F11 doesn’t appear to do anything.
Don’t immediately assume that your MSI computer doesn’t have a boot menu. There are several things you can check.
1. Start Pressing F11 Earlier
Timing is one of the most common problems.
Instead of waiting for a message on the screen, begin pressing F11 immediately after pressing the power button.
MSI recommends repeatedly pressing F11 around the time the MSI logo appears.
2. Try a Complete Shutdown
If the computer is already running, shut it down completely and then turn it back on.
This gives you a fresh startup sequence and makes it easier to access the firmware-level boot menu.
3. Check the Keyboard
Make sure your keyboard is working before troubleshooting BIOS settings.
For a desktop, try connecting a wired keyboard directly to a rear USB port. Avoid relying on a wireless keyboard if it isn’t being detected during early startup.
4. Try the Delete Key
If F11 isn’t working but you can enter BIOS, press Delete repeatedly during startup.
Once inside BIOS, check the Boot section and look for available boot devices or boot priority options.
MSI documentation shows that the Boot menu can also be managed from BIOS by selecting the appropriate Boot Option.
5. Check Your MSI Model’s Manual
MSI notes in its older support documentation that not every motherboard necessarily uses the same boot-menu key, so checking the manual for your exact model is sensible if F11 doesn’t work.
Can You Access UEFI Without Pressing F11?
Yes.
If Windows is still working, you can use Windows Advanced Startup to reach UEFI firmware settings without relying on keyboard timing.
In Windows 11, go to:
Settings → System → Recovery → Advanced startup → Restart now
After the PC restarts, select:
Troubleshoot → Advanced options → UEFI Firmware Settings → Restart
Microsoft documents this process for accessing UEFI firmware settings from Windows.
Keep in mind that UEFI Firmware Settings is not exactly the same thing as the one-time F11 Boot Menu. It takes you into the firmware interface, where you can change boot-related settings and other hardware options.
How to Change the Boot Order in MSI BIOS
If you regularly boot from a particular drive, changing the boot priority may be more convenient than pressing F11 every time.
Start the computer and press Delete repeatedly to enter BIOS.
Then look for the Boot section.
You may see options such as:
- Boot Option #1
- Boot Option #2
- UEFI Hard Disk
- UEFI USB
- Windows Boot Manager
- Network
- NVMe storage
Select the device you want to prioritize and save your changes.
MSI’s support documentation shows the Boot menu and Boot Option #1 being used to specify the preferred boot device.
MSI Boot Menu Key for Windows Installation
If you’re installing Windows on an MSI computer, F11 is particularly useful because it lets you select the Windows installation USB without permanently changing the boot order.
The process is:
- Create a bootable Windows USB.
- Connect it to the MSI PC.
- Shut down the computer.
- Turn it on.
- Press F11 repeatedly.
- Select the Windows USB.
- Press Enter.
- Follow the Windows installation instructions.
MSI’s own notebook installation guide uses this F11 method for selecting Windows installation media.
F11 Boot Menu vs. UEFI Boot Options
It’s useful to understand the difference between the two.
| Option | Main Purpose |
|---|---|
| F11 Boot Menu | Select a device for the current startup |
| Del BIOS/UEFI | Change firmware and boot settings |
| Windows Advanced Startup | Access recovery and UEFI options from Windows |
| Boot Option #1 | Set the preferred default boot device |
If you only need to boot from a USB once, F11 is usually the simpler option.
If you want the computer to permanently prioritize a different drive, use the BIOS/UEFI boot settings instead.
Why Doesn’t My USB Drive Appear in the MSI Boot Menu?
If F11 opens successfully but your USB isn’t listed, check the USB itself.
Possible causes include:
- The USB isn’t actually bootable.
- The installation media was created incorrectly.
- The USB port isn’t detecting the drive.
- The drive isn’t compatible with the current boot mode.
- The firmware isn’t recognizing the device.
- Secure Boot or other firmware settings are affecting the boot process.
Try another USB port and, if possible, another bootable USB drive.
If the drive works on another computer but not on your MSI system, check the MSI BIOS settings and documentation for your exact model before changing firmware options.
Should You Press F11 Once or Repeatedly?
Press F11 repeatedly.
You don’t need to hold the key down continuously. Repeatedly tapping it during the early startup period is the recommended approach in MSI’s support instructions.
The important part is timing.
If you wait until Windows begins loading, you’ve generally missed the firmware boot-menu window.
Frequently Asked Questions
What is the MSI boot menu key?
For supported MSI systems, F11 is the boot menu key. MSI’s official documentation confirms F11 for boot-device selection.
What key opens BIOS on MSI?
Delete (Del) is commonly used to enter MSI BIOS/UEFI setup. MSI’s official troubleshooting documentation instructs users to press Del continuously during startup to enter BIOS.
Can I boot Windows from a USB using F11?
Yes. MSI’s notebook documentation specifically describes pressing F11 during startup and selecting the Windows installation media from the Boot Menu.
What if F11 doesn’t work?
Try a complete shutdown, connect a wired keyboard if possible, and begin tapping F11 earlier during startup. If the problem continues, check the documentation for your exact MSI model. MSI itself notes that some boards can use different boot-menu keys.
Can I access UEFI from Windows?
Yes. In Windows 11, go to Settings → System → Recovery → Advanced startup → Restart now, then select Troubleshoot → Advanced options → UEFI Firmware Settings → Restart.
Final Thoughts
The MSI boot menu key is F11 on supported MSI systems, making it easy to select a USB drive, Windows installer, recovery media, or another bootable device without permanently changing the boot order.
If F11 doesn’t work, focus first on startup timing, keyboard detection, and your exact MSI model. If Windows is accessible, Microsoft’s Advanced Startup options provide another route into UEFI firmware settings.
For most users, remember this simple combination:
F11 = Boot Menu
Delete = BIOS/UEFI Setup
That distinction makes booting from USB or another device much easier on an MSI computer.
